00:00.0
00:05.9
Welcome to Part 4 of our Mitsubishi GX Works 2 tutorial.
00:06.4
00:13.0
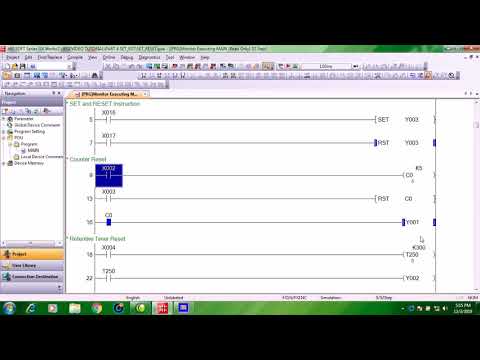
Our topic is about the Set and Reset Instruction of Mitsubishi FX PLC.
00:14.7
00:17.2
If you are familiar of latching circuit
00:17.3
00:21.1
that is most used in relay logic direct on line motor starter
00:21.2
00:27.8
this is almost the same function as the Set and Reset instruction of the PLC.
00:33.0
00:39.8
Let us see the operation of an ordinary latching circuit.
00:45.0
00:47.1
This is the stop button
00:47.2
00:49.4
and this is the start button.
00:50.0
00:52.9
If we activate the start button
00:54.0
00:56.8
The output coil will be latched.
00:59.7
01:08.4
Even if the start button is released the output is latched through this contact.
01:09.5
01:22.0
If we press the stop button the latch will be released.
01:22.8
01:26.2
The coil will then be deactivated.
01:27.0
01:29.8
For the Set and Reset instruction
01:32.2
01:36.4
This will be the start pushbutton and this will be the stop pushbutton
01:36.5
01:39.0
and this is the output coil.
01:40.5
01:48.0
If we activate this contact
01:48.1
01:51.5
the output coil will be set.
01:51.6
02:00.0
Even if the input contact is opened the output coil will remain On.
02:06.0
02:09.0
In order to turn off the output coil
02:09.1
02:15.0
the Reset instruction must be activated.
02:25.0
02:30.0
That is the basics for Set and Reset instruction.
02:36.5
02:43.6
Set and Reset instructions are not limited to latching applications.
02:43.8
02:49.4
Reset is also used in PLC counter applications.
02:50.5
02:56.8
For example in counters, if the Set value has been reached
02:57.5
03:04.5
Reset should be used in order to return back to 0 count.
03:06.5
03:08.0
We will see how it works.
03:18.2
03:22.3
Even if the Preset value has not been reached,if the counter is reset
03:22.4
03:25.0
the current count value will reset to 0.
03:27.0
03:36.5
We will try to count up to the set value
03:42.0
03:48.5
The counter coil is activated and its contact is closed
03:48.6
03:55.5
The output coil is also activated.
04:02.0
04:09.0
In order to open the this contact the counter must be reset.
04:10.4
04:16.7
This input contact must be activated to reset the counter.
04:27.5
04:36.7
For timer application, reset is used for retentive type timers.
04:36.8
04:43.8
These are the timers that in the event the PLC is stopped
04:43.9
04:59.0
or there is a power failure the running count value during the time the PLC stopped is retained.
05:00.2
05:04.5
For example when we activate this X4 input contact
05:05.0
05:08.3
the timer will start counting.
05:08.4
05:16.7
Suppose this contact will open, the current count is retained.
05:26.0
05:34.0
It has the capability to pause the counting or timing process.
05:34.1
05:38.3
In order to continue the timing this input contact must be closed.
05:43.0
05:52.5
Once the set value is reached the timer contact will close.
06:10.0
06:15.1
The timer contact closed ang the output coil is energized.
06:15.2
06:22.4
Even if this input contact is opened the timer will not reset.
06:30.5
06:36.6
In order to reset the timer to 0, and to open the timer contact
06:36.7
06:39.5
the timer has to be reset.
06:48.0
06:52.2
That is how to use the Reset instruction for Retentive Timer.
06:52.3
07:03.0
The timer can also be reset while in the middle of timing process.
07:14.0
07:23.3
For data registers or other word devices its value can be reset.
07:24.0
07:29.2
For example we have accummulated value in the data register,
07:29.5
07:37.2
supposing there is a sensor in the input that counts finished products
07:37.3
07:49.2
the accummulated number can be reset.
07:49.3
07:52.8
We will see how it works.
07:52.9
08:00.8
Every time the input goes high,
08:00.9
08:06.9
the data register value is incremented due to the Increment Instruction.
08:25.0
08:28.0
In order to reset the data register value to 0,
08:28.5
08:36.0
we will provide a Reset Instruction to the data register.
08:48.5
08:52.2
There is also a Zone Reset Instruction.
08:52.3
09:05.7
This is used to reset in one time a range of bit devices, counters, timers or data registers.
09:06.5
09:16.5
Example this range of auxiliary relays are set,
09:17.2
09:20.5
we ran reset all of it in one time.
09:21.0
09:27.4
For example from M10 to M12 can be reset in one time.
09:27.5
09:30.8
The instruction is Zone Reset,
09:32.4
09:36.6
This is the first destination device
09:36.8
09:40.6
and this is the second destination device.
09:40.7
09:45.5
The second destination device must be higher
09:45.6
09:50.8
compared to the first destination device.
09:57.0
10:04.9
The specified device range cannot contain mixed device types.
10:05.1
10:10.0
For example a counter here and the other is a timer is not allowed.
10:10.1
10:23.5
Devices must be of the same type.
10:23.6
10:37.0
For example we set M10 to M13
10:39.0
10:46.6
then we will reset in one time M10 to M12.
10:53.0
10:59.1
The three auxiliary devices has been reset.
10:59.6
11:02.7
M13 was not included because
11:02.8
11:08.9
only the devices within the range is covered by the zone reset instruction.
11:09.6
11:13.4
So we have to reset M13 individually.
11:24.0
11:34.7
That is all for the basic tutorial on how to use the Set and Reset instruction.
11:36.0
11:43.5
We will discuss the Timers on the next video tutorial.