00:16.2
00:19.7
Hello guys! Welcome back to my channel
00:19.8
00:23.1
and for this video, I'm gonna show you how I render my works
00:23.2
00:24.7
with hatching techniques
00:24.8
00:28.0
and how I pair it with "block inking"
00:28.1
00:31.7
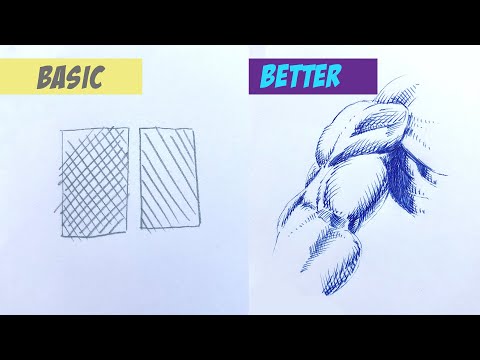
Basically hatching is a technique used to add
00:31.8
00:35.8
gradients and depth in the form of texture
00:36.0
00:38.7
I use two types of hatching
00:39.1
00:40.5
it's called: the Cross Hatching
00:40.6
00:41.9
and the Parallel Hatching
00:42.1
00:44.1
it is a GREAT way to
00:44.5
00:47.1
grade down from a block of ink
00:47.9
00:49.7
here's an example:
00:50.0
00:53.1
Imagine you have a sphere, rendered in monochrome
00:53.3
00:54.4
like this one
00:54.7
00:59.7
but smooth gradients from dark to light isn't your art style
01:00.0
01:03.3
and you prefer the more "edgy" comic style renders,
01:03.7
01:06.2
the way comic artists do it
01:06.3
01:08.5
is by using the hatching technique.
01:10.5
01:14.9
Parallel Hatching which are lines drawn side-by-side each other,
01:15.6
01:20.7
while Cross Hatching are lines drawn in an opposite angle
01:21.1
01:23.3
or in an opposite direction.
01:26.6
01:28.2
The way it works is
01:28.3
01:32.6
the more lines, or in this case, "hatches" you put in
01:32.8
01:35.3
the more it will darken. And vice versa:
01:35.8
01:39.0
the lesser the hatches, the lighter it will look.
01:40.3
01:43.7
Most of the comic artists use block inking
01:44.3
01:47.1
to add more contrast to the gradient.
01:49.7
01:52.4
One tip to make it even more smoother
01:52.7
01:56.2
is to increase the spaces in between the lines
01:56.3
01:58.3
as they go further along
01:58.4
02:00.7
while making the lines smaller.
02:12.3
02:15.8
My second tip is to follow the form of your basic shape
02:17.0
02:20.7
if you have a circle and wanted to make it look like a sphere
02:21.3
02:23.8
you'll have to curve the hatches so it'll add
02:23.9
02:27.1
extra information about the form of the figure.
02:41.5
02:43.5
as you can see here
02:43.6
02:46.4
this part suggests that it has volume
02:47.0
02:49.4
and its shape is like this :)
02:49.7
02:52.7
while the lower part looks flat :(
03:49.4
04:07.9
*take note of how I render them blobs
04:37.0
04:41.2
My third tip is to draw your base hatches with "roots"
04:41.5
04:42.5
what do I mean by that?
04:42.7
04:44.4
It's something like this:
04:44.7
04:46.8
make the base ends heavier
04:46.9
04:49.4
like how a strand of hair will look like
04:49.5
04:52.5
according to that one shampoo commercial
04:53.4
04:55.0
just make sure that
04:55.4
04:57.9
you will put the roots on the side
04:58.0
05:01.5
where the thick lines are supposed to be
05:01.8
05:04.9
because remember that we are using hatches to grade.
05:06.0
05:08.9
This will also increase the depth of the lines
05:09.1
05:13.6
and add more contrast when you can't block it in.
05:15.0
05:18.2
You don't need to make the hatches, cross all the time
05:18.3
05:20.7
it will definitely be up to your art style--
05:22.1
05:24.2
remember that the more lines you put in
05:24.3
05:26.9
the heavier and darker it will look like
05:27.1
05:29.0
so be careful [with it].
05:34.0
05:37.2
Here are some examples of how I use the technique.
05:38.7
05:42.6
For this, I'm gonna render it in pencil, in pen,
05:42.7
05:45.3
and in a regular ballpoint pen
05:45.4
05:48.9
to let you know that you don't need fancy art materials
05:49.0
05:51.4
for you to make quality artworks,
05:51.8
05:55.0
The best tool is the one you have in your pencil case.
06:08.1
06:12.1
Notice that I used cross hatching on the eyebrows
06:12.6
06:17.0
because I want to capture the strands of hair
06:17.3
06:20.6
and mainly because eyebrows should be dark.
06:21.5
06:24.6
And as I've said,the more hatches you put in--
06:24.9
06:27.4
the darker it will appear.
06:31.5
06:34.0
We want to keep particular details of the face
06:34.1
06:36.2
to be rendered lightly as possible
06:36.5
06:40.1
unless, you're going for a dramatic effect where the cast shadow
06:40.2
06:42.2
is very prominent to give a vibe of
06:42.3
06:45.8
mystery, anger,or revenge
06:46.4
06:49.7
then in those cases you may want to use block inking
06:49.8
06:54.4
and have that crisp edges that will define specific features.
07:01.7
07:04.6
Now let's move on to using the hatching technique
07:04.8
07:07.0
to render a mascular form.
07:07.1
07:10.7
I will be rendering an arm muscle particularly
07:10.8
07:13.6
since it has a lot of shapes in varying size
07:14.1
07:17.3
and I always find it fun to render.
07:25.3
07:28.5
Remember the blob that we are rendering a tad earlier?
07:29.1
07:33.2
You can use the same logic of rendering in this.
07:54.4
07:58.2
If you notice, I block in those parts where
07:58.3
08:00.6
I know the hard shadows will be
08:00.7
08:04.1
and then feathered it out with parallel hatching
08:04.2
08:07.6
to help the viewer's eyes to ease in.
08:07.7
08:08.4
Ease out...?
08:10.2
08:11.2
(ease out...?)
09:37.7
09:41.3
And for the last example, let's render a tree.
09:41.8
09:45.0
Hatching isn't only good for rendering muscles and figures,
09:45.3
09:48.5
but it is also good for rendering backgrounds.
09:50.9
09:55.2
In here I am just hatching in following the form of the tree
09:55.3
09:57.0
but randomly.
10:01.5
10:05.2
You'll see that there's nothing special with what I'm doing,
10:05.3
10:07.4
everyone can do this basically!
10:08.6
10:12.9
As you can see, you may also render it this way.
10:13.4
10:17.1
The simpler the hatches is, the softer it will seem.
10:39.2
10:45.2
It's break from my usual content but I am brewing something really awesome for you guys
10:45.4
10:48.5
so hit that notification bell if you haven't yet.
10:48.9
10:52.8
And if you're new to my channel, please click that subscribe button
10:52.9
10:57.7
as it will greatly help me to fund my future artworks.
11:00.3
11:02.5
dun-dun-dun-duuuuuuunnnn!
11:02.8
11:04.8
And we are done!
11:04.9
11:08.3
If you think that I should do more tutorials like this,
11:08.5
11:13.4
or if you want me to share more of my process in-depth,
11:13.7
11:15.3
or if you wanna share yours
11:15.6
11:17.6
Let me know in the comments down below!
11:17.7
11:20.4
So I guess, that's it for today
11:20.5
11:22.5
I hope you learned something from me.
11:22.7
11:24.8
Again, this is kimkimkim
11:24.9
11:27.2
pick up your pencils and get better at your art
11:27.3
11:29.1
one drawing at a time.